Add A Listing
In this training module, you’ll learn how to add a listing, a crucial skill for growing and maintaining your directory. Initially, it’s recommended that you handle listings yourself to lay a solid foundation for your directory. This hands-on approach gives you valuable insights into the process, which can be useful if you decide to outsource this task later on.
The Information-Collecting Template
This template helps you efficiently gather essential business information for inclusion in your directory. It can also be exported to CSV to use with the CSV Import plugin. You can gather the information yourself, give the template to your freelancer/VA if you choose outsource this task.
In our healthcare directory, we’ve got two types of listings: Doctors and Facilities (Clinics), and they each have their own little quirks in how they’re set up. So, you’ll need to use two different templates to gather the right info for each one.

Healthcare Listing Collecting Template – Doctor
Healthcare Listing Collecting Template – Clinic
Additionally, if you prefer a hassle-free option, you have the choice to buy Done-For-You leads in any city of your preference through my service. Learn More Here.
Bulk Import Listing Using CSV File
Once you have collected listing information in the Google Sheet, you can save it in CSV format and utilize the pre-installed CSV import plugin to import all the listings at once. Follow these steps:
1- Save the file as CSV

2- Navigate to your WordPress dashboard and access ‘Ultimate CSV Importer Free’.

4- After uploading, select ‘Import each record as DOCTOR’ or ‘FACILITY’, based on the type of listing file you’re importing.

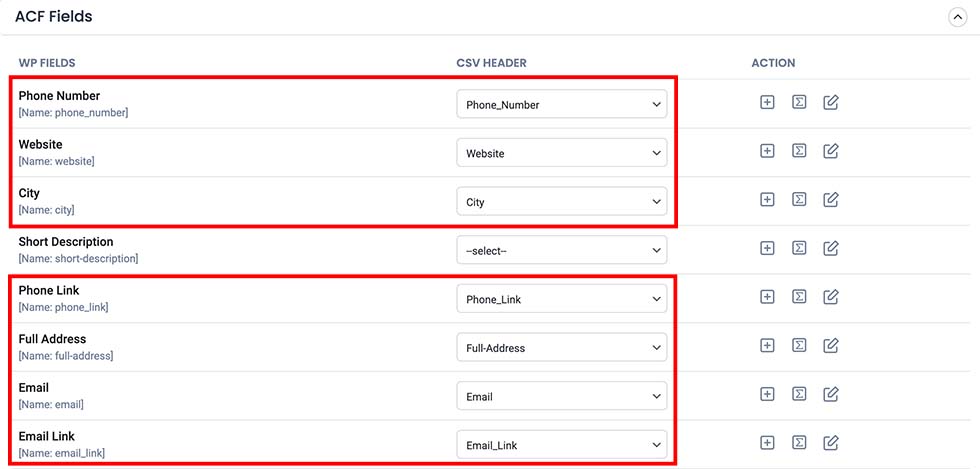
5- Make sure to keep the headlines of the columns in the CSV file correct as provided in the template. This ensures that the fields will be automatically assigned correctly to the listing. However, it’s always a good practice to scroll down and verify the following fields just to be sure.

WordPress Core Fields:
- Title – Post_Title
- Leave Other Fields Empty

ACF Fields:
- Phone Number
- Website
- City
- Phone Link
- Full Address
- Email Link

6- Scroll down and click ‘Continue’
7- Click ‘Continue’ with Media Handling
8- Click ‘Start Import’ and wait for a few seconds


Add A New Listing Manually
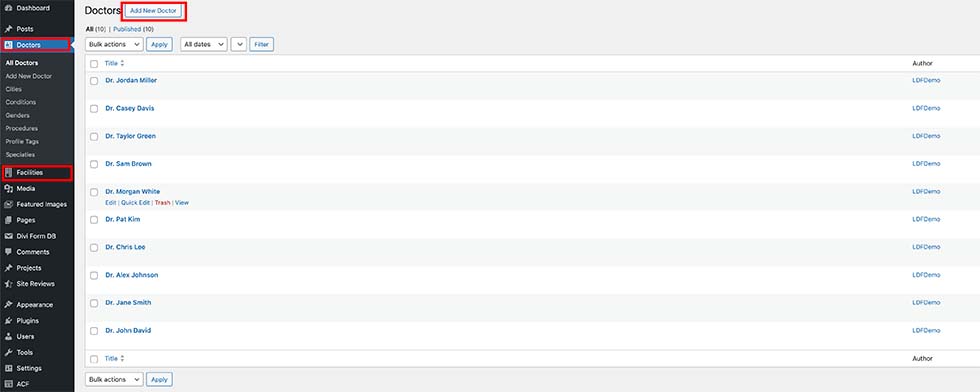
To add a new listing to your directory, from your WordPress dashboard, navigate to “Doctors” and then select “Add New Doctor’, or navigate to “Facility” and select “Add New Facility”.

On the “Add New” page, after entering the doctor/clinic name, it’s crucial to carefully fill in the specified fields.

1. Administrative Details – Doctors:
– Average Rating: Your personal review score.
– Doctor Tier: Choose ‘Basic’ for a simple listing, ‘Standard’ for more details, or ‘Featured’ for top-notch visibility and additional details.
– Rating Criteria: Your subjective ratings for the doctor based on four criteria
2. Basic Information – Doctors:
– Website, Phone Number, Email & Full Address.
– Phone Link and Email Link
– Short Description for the doctor profile
– City: Select from the list of available cities on your site.
– Specialties: Select up to 2 specialties of the doctor.
If you want to add more cities and specialties to the list, refer to the “Managing Taxonomies” tutorial. Click to view.
3. Right Sidebar
– Set the Featured Image for the listing.
– Write an excerpt for the listing (this will appear in search results).
Once you’ve filled in all the fields, you’ve crafted a basic profile. Simply hit ‘Publish‘ to make the profile live.
Start by listing as many BASIC LISTINGS in your chosen area as possible, then kick off your directory promotion. Next, you can encourage businesses to claim their listings.
Add Further Details to the Profile
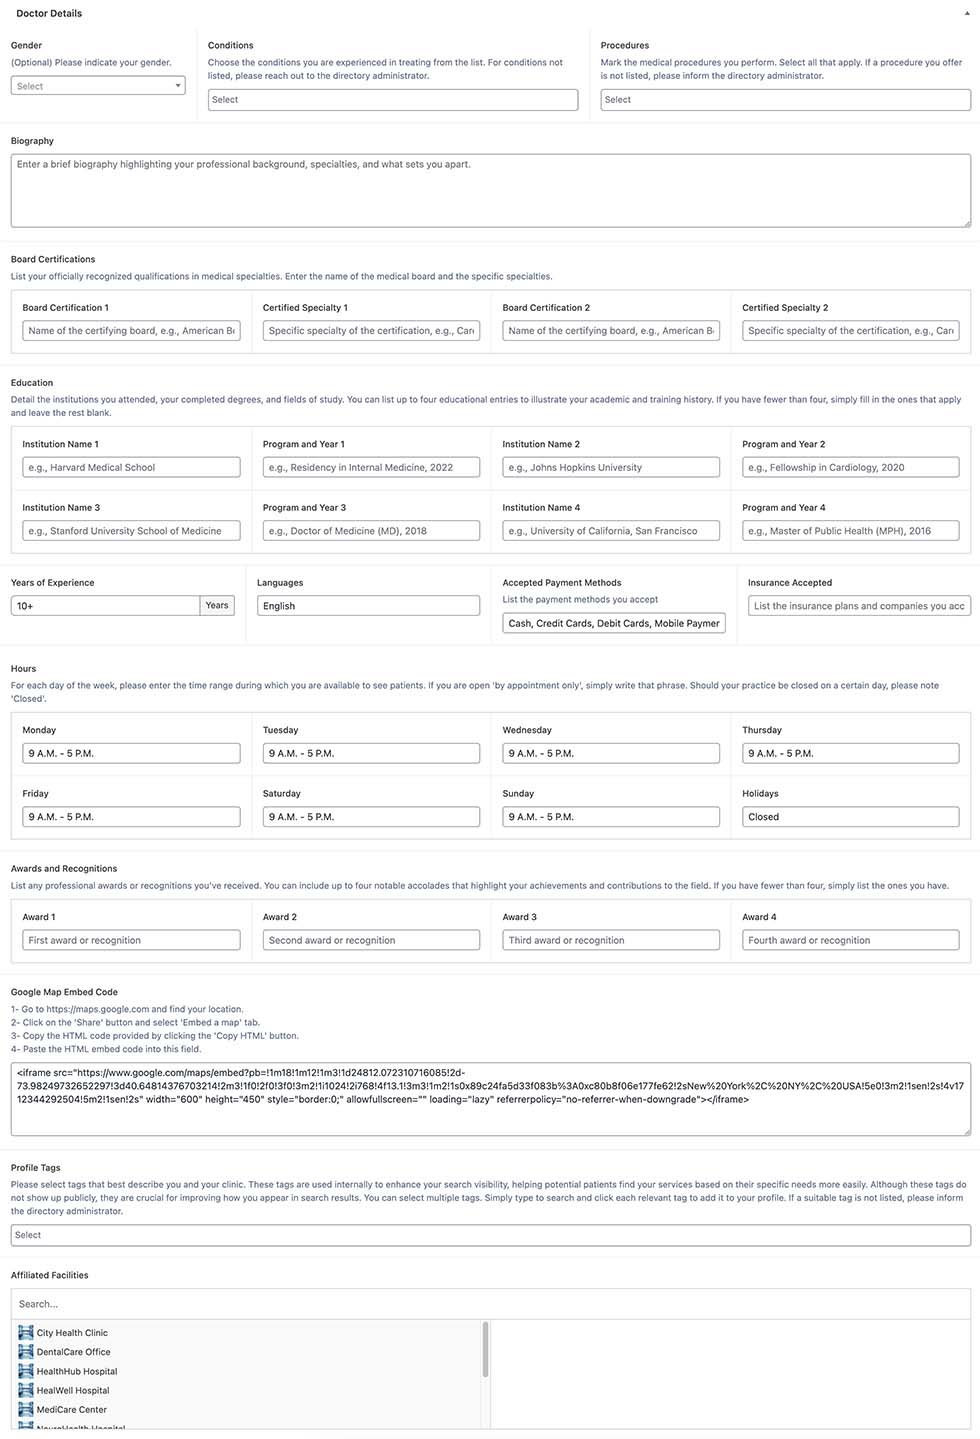
If you set the Doctor Tier to ‘Standard’, a set of new details will appear as below:

Doctor Details:
All the details you enter in those fields will appear on the front-end of the listing:
– Gender of the doctor: Choose from Male, Female, Non-Binary, or ‘Prefer Not to Say’
– Conditions & Procedures: Select all conditions treated and procedures performed by the doctor
– Full Biography
– Enter Board Certifications and Education of the doctor
– Years of Experience
– Languages spoken
– Accepted Payment Methods
– Accepted Insurance plans
– Specify Working Hours on weekdays and holidays
– List up to 4 awards and recognitions
– Google Map Embed Code: Follow the 4 steps listed below the fields to get a Google Map embed code, or check out our tutorial for more details
– Profile tags: Select keywords relevant to the doctor to enhance their visibility in search results
– Affiliated Facilities: Choose from the available facilities listed in the directory to link them to the doctor’s profile. This feature provides a valuable two-way linking system, automatically adding the doctor to the corresponding facility page.
If you want to add more Conditions, Procedures and Profile Tags (Keywords) to the list, refer to the “Managing Taxonomies” tutorial. Click to view.
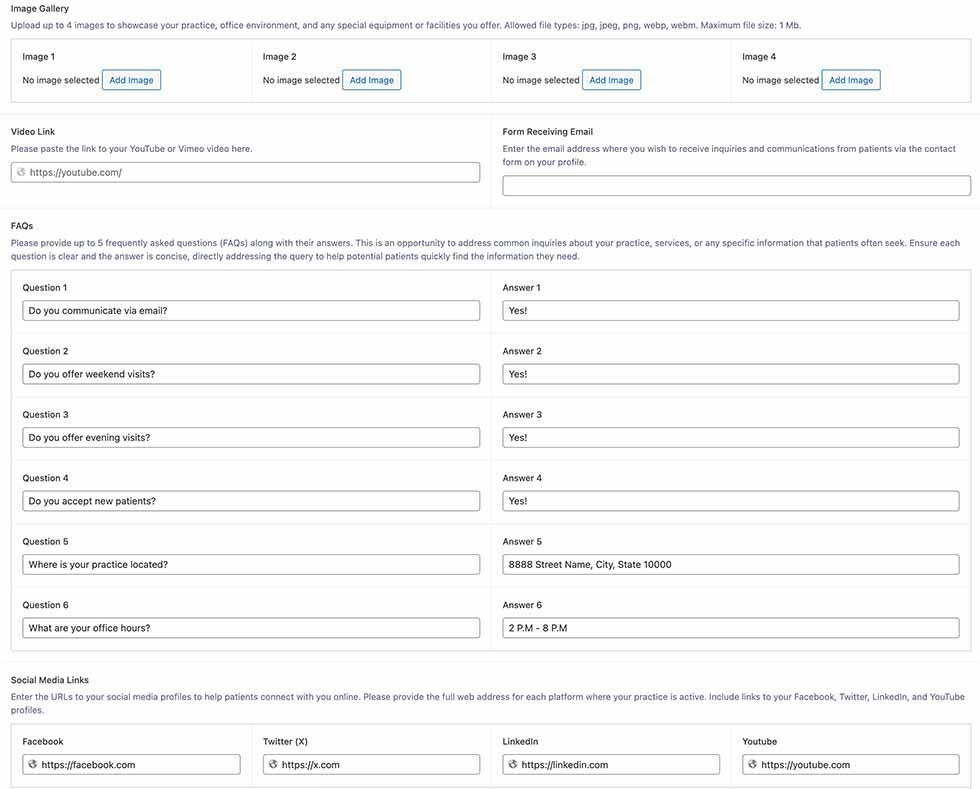
If you set the Doctor Tier to ‘Featured’, a set of new details will appear as below:

– Image Gallery: Upload up to 4 images
– Video Link: Link to the doctor’s Youtube or Vimeo video
– Form Receiving Email: For featured profiles, a dedicated contact form sends entries directly to the doctor’s email. Enter the desired email address for receiving form submissions.
– Enter up to 6 Frequently Asked Questions and Answers
– Social Media Links: Link to the doctor’s Facebook, Twitter, LinkedIn, and YouTube profile pages.
If you use the Upgrade Directory with the Account Feature, here’s how it works: you can initially add a basic listing. Then, when a business signs up for an account on your directory to claim the listing, you can assign the post to them and set the Profile Tier to either ‘Standard’ or ‘Featured’. This allows them to manage all the details themselves.
